Friday, November 16, 2007

HDR Tone Mapping Using Film Profiles

By definition, an HDR image contains more latitude in pixel brightness than can be displayed on a monitor. When you take a standard digital photo of something bright like the sky at sunrise, a short exposure may capture the sky properly, but the ground will be black. Re-expose to capture the ground and now the sky is blown out.


The really maddening thing about digital cameras if that you get to see the photo right after you take it. So you see your black ground on the screen but then look up to find that the ground isn't black at all. In fact, it may look about as bright to you as the much lighter exposure where the sky is completely gone. There you stand with your eyes easily able to see everything, a little annoyed with your camera's poor showing.

In a nutshell, the problem is dynamic range. You eyes can capture a wide dynamic range, but the camera is capturing a narrow one. HDR photography lets you combine different exposures to create a floating point image that represents the real world scene being photographed, sans your camera's limitations. But then when you want to show these scene-referred pixels on your monitor, you have to do some tone mapping.

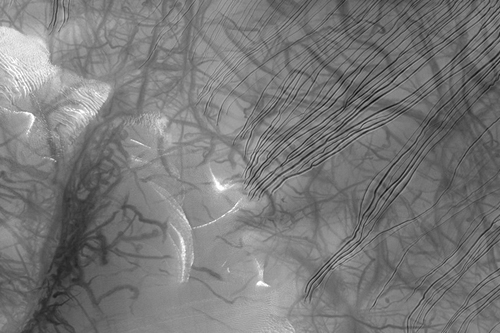
Here are examples of tone mapping available in Adobe Photoshop and After Effects. The first four are the standard ones that ship with Photoshop, while the last two are made using a technique I'll show you.


Legend:
1. sRGB / Gamma 2.2 curve
2. Highlight Compression
3. Equalize Histogram
4. Local Adaptation
5. Film Profile Tone Mapping
6. Film Profiles + color correction and film grain

The sRGB curve in #1 is what is typically displayed by default. A gamma curve is applied to the 0.0-1.0 range and the rest is clipped. This is what you'd get from just taking a regular photo.

Options 2-4 try to bring bright values down into visible range without crunching the other pixels too badly. You can see in each example that more detail has been brought out around the sun and the coarse clipping has been reduced. However, each technique has trade-offs. You'll notice that detail is lost in areas where a bright object comes close to a darker one such as the disappearance of a clear horizon line near the sun. Local Adaptation can sometimes produce halos in these circumstances as it fights to maintain contrast while bringing pixel values together. Sometimes the image comes out looking more like a painting than a photo.

Don't get me wrong, each image is different and these algorithms can produce some good results. But a tone mapping technique I have grown to like involves simulating the way film would capture that same scene. For one reason or another, people have always had a fondness for the look of film, and many movies are still shot on film for this reason. But what is it about the look of film that people like so much?

One explanation is that film is the original high dynamic range capture format. Even under long exposures a film negative is never absolutely 100% exposed, so the bright areas of highlights can retain detail that would be lost by a CCD.

After Effects CS3 ships with a series of ICC profiles that describe the response of different film stocks to light. Since an HDR image describes the actual light in a scene, converting from the linear HDR color space profile to a film stock profile using the Color Profile Converter creates a simulated negative in Log space (make sure you use the Absolute Colorimetric intent). From there, you can apply a Theatre Preview Profile, which simulates that negative getting printed on a film positive and the projected. So if you trust the color science involved, you're looking at your scene as if you had shot it for a Hollywood movie.


Looking at example #5, you can see that the results are pretty impressive. There is a good tradeoff between detail around the sun and detail in the rest of the scene. And the sun has a very nice film-style glow around it with no hard clipping at all. Since the film profile response is a simple curve, you don't get any of the artifacts of the other tone mapping methods. Finally, there is probably something about the simulated printed film that will remind you of all the movies you ever saw before the dawn of the digital age.

In this case I'm doing everything manually—I've disabled all color management by using no working space profile and checking "Preserve RGB" in the HDR files. The same process can be set up as a display LUT so that your project lives in linear, but gets viewed through the film preview. To do so, set a linear project working space, turn on Display Color Management in the View menu, and then turn use View > Simulate Output > Kodak 5218 to Kodak 2383, which uses the same settings I am. However, to actually output an 8-bit JPEG or TIFF with the film look, you'll have to set up the Color Profile Converter as I have.

In example #6, I have done a little more processing. By applying a Levels call to the original linear HDR pixels, I can do a realistic color correction where light is brought down in the scene as it would in nature, making it cooler in this case.

Then I add a little film grain while the pixels are in simulated Log space, in between the two Color Profile Converter applications. Add grain is a 16-bit effect, but this matters little because log space does not need floating point values over 1.0. In fact, Log is usually stored in 10-bit Cineon files, so you have more bits than a typical film scan would.

By switching the simulated film stocks, you can also see how your same scene—accurately stored as an HDR image—would appear using different stocks. Much cheaper than experimenting with the real thing.

Tuesday, November 13, 2007

Power Picker 1.1

At long last Power Picker has been updated to work with modern operating systems and the latest version of After Effects. That means Universal Binary for you Mac users.
BTW, does anyone else dig the Power Picker logo?


Thank you PP users (especially Ruth Dial) for your patience!

Monday, November 12, 2007

ProEXR is a CS3 Essential

In the November issue of DV, Ned Soltz lists ProEXR as one of the "Ten Essential Photoshop CS3 Plug-Ins." Got that right…I mean…thanks!

Writing in the Instant Expert column, he calls it an "important acquisition for those who regularly go between PS and AE." How nice of him! If you're not a DV subscriber, you can currently view a PDF version of the article here.

Friday, November 2, 2007

ProEXR 1.2 released

I've posted an update to ProEXR. There are a number of small improvements in this version, mostly based on user requests and bug reports.

One feature I'll mention is that ProEXR is now saving more of the standard EXR metadata in files it creates. Information such as the user and computer name is being stored, which can be particularly useful for people with render farms trying to track down the source of a bad frame. In After Effects, the project and comp used to create the file are stored too, along with anything written in the seldom-seen Render Queue Comments field.

To see all the attributes being stored, open an EXR in Photoshop and view the File Description.

Thursday, October 25, 2007

Free Übercolor

When After Effects 7 was released a few years ago, the new color management features made our Übercolor plug-in obsolete, so it was quietly discontinued. (In fact, one might say that Adobe's Color Profile Converter bares a remarkable resemblance to Übercolor.) No big deal—this is all part of life as a plug-in developer.

But today I got an email from an AE 6.5 holdout looking to use it. So I thought what the heck, and uploaded a free version to the old product page.

Tuesday, October 9, 2007

Huge JPEG 2000 images

The High Resolution Imaging Science Experiment at the University of Arizona is hosting some gigantic images snapped (or rather scanned) by the Mars Reconnaissance Orbiter (MRO). The full version of the image shown below is 31,850 x 77,994 pixels! Each pixel represents 30 cm on the Martian surface.


It wasn't until Photoshop CS (8.0) that the program could even accept images bigger than 32,767 on a side, and few available file format modules can import such images, but j2k 2.01 can. Granted, doing so can take quite a while between the decompression process and all the virtual memory swapping Photoshop needs to do to.

A more efficient way to browse their JPEG 2000 images is by clicking on a link that brings up the Java-based IAS Viewer, which dynamically loads just the part of the image you're viewing at just the resolution you need, taking advantage of one of the key features in JPEG 2000. They also have a sweet Flash-based app to do the same. This reminds me of a personal feature wish for j2k to allow the user to reduce resolution when importing big files into Photoshop.

The idea behind the project is that members of the public will scan the images for features and report the interesting bits back to scientists.

Wednesday, September 19, 2007

MatchMover Pal

I decided to revive an unofficial fnord product, MatchMover Pal. This is a free plug-in for After Effects that lets you import tracker data from Realviz MatchMover, which has in my mind the best 2D tracker money can buy.


The Realviz tracking algorithm seems good enough, but what really makes MatchMover great is that it provides a timeline interface for creating multiple tracker keyframes and then tracking forward, backwards, or even bidirectionally. While tracking, the point is shown in a big magnified window so you can see if it wanders and the track accuracy is color coded. Finally, MatchMover loads image sequences very fast as it tracks. It really is the best tool for beating a tough tracking job into submission.

Of course, MatchMover's real mission is to re-create a 3D camera move—a much more complicated task, for which they charge accordingly. I doubt anyone would be interested in paying all that money for the 2D tracker alone, but if you already have it, MatchMover Pal will help you use it with After Effects. The plug-in will also create a 3D scene in After Effects from a Realviz .rz3 file.

Download

PS - I realize this functionality could have probably been added through AE scripting instead of a plug-in, but AE scripting wasn't able to do everything I needed when I originally wrote it for AE6.

Monday, September 17, 2007

ProEXR 1.1 released

We've released an update to ProEXR that contains performance improvements, minor bug fixes, and enhancements to the After Effects Comp Creator. Everyone should go get it.

Probably my favorite feature, however, is a new report that you'll find in Photoshop's File Info dialog. Look in the Description field and you'll see a complete breakdown of all the channels and custom attributes included in the EXR. For those of us that can get files from a variety of places, it can be very interesting/useful to see exactly what's in a file. For example, some of the ILM Sample Files contain information like aperture, altitude, latitude, and longitude.


Since this report can get a little long in Photoshop CS3 and earlier, I've made a Custom File Info Panel that fills up the whole dialog with it. Download it here and drop it into the Custom File Info Panels folder:

Mac:
/Library/Application Support/Adobe/XMP/Custom File Info Panels/

Win:
C:\Program Files\Common Files\Adobe\XMP\Custom File Info Panels\

Currently there is no way to save your own custom attributes in an EXR, but options for doing so could be explored if there is interest from users.

Incidentally, we've done some benchmarking recently and our tests have shown the After Effects plug-ins to be somewhat faster than Adobe's included OpenEXR plug-in. This can mostly be attributed to ProEXR providing a native AE plug-in, while the Adobe plug-in is actually made for Photoshop. So yet another reason to switch to ProEXR.

Thursday, September 6, 2007

Controlling Alphas with ProEXR

One of the more unique features of ProEXR is that it lets you choose how alpha channels are treated. Usually Photoshop takes an alpha channel and makes a layer with transparency, but some people would prefer to have the alpha channel kept seperate, particularly if they plan to use it for something unrelated to transparency like a bump map.


In ProEXR, holding down the option (Mac) or alt (Win) keys as the file loads causes any alpha channel(s) to show up on separate layers.

Update: In ProEXR 1.3, holding down shift now brings up a dialog with these import options and more.


Under ProEXR naming conventions (see the manual), a layer named "RGBA" will save layers "R", "G", "B", and "A" in the file, but a layer "RGB" will skip the alpha. Then if you have a separate layer called "*A", the red channel in that layer will become "A".

Or to put it simply, if you separate the alpha by holding down option/alt, save the file without changing the layer names and you'll get the RGBA file you expect.

Another Update: ProEXR now includes ProEXR EZ, a simpler EXR plug-in that lets you send direct the alpha to the channels palette when you hold down the shift key.

Wednesday, August 22, 2007

ProEXR in CS2?

People have been asking if they really need to get Photoshop CS3 Extended to use ProEXR.

The answer is: not necessarily. But only CS3 Extended does layers in floating point (32 Bits/Channel mode), so other versions won't have access to what I consider to be the biggest feature in ProEXR.

If you're OK with that and still interested in a variety of compression options and retention of color information, go ahead and try it in regular CS3 or in CS2 (the first version that had floating point). While not officially supported, I will admit that a little testing was done in those versions and some code was added to make ProEXR work in them. And heck, it runs in trial mode for 15 days, so try it.

On the After Effects end, I would have loved to get the OpenEXR plug-ins working back in AE7, but it shipped with a bug that prevented floating point images from having 3D Channels. So you really do need CS3 to run those.

Tuesday, August 21, 2007

HD Photo: Not Too Shabby

You know that we here at fnord have a thing for file formats. Don't ask why, we just do.

Well, there's a new format coming down the pipe, and it's HD Photo. It looks like the format to rule them all, so of course it must come from Microsoft. And that's why it pains me to say this: HD Photo actually looks really great. You can try it right now by getting their free Photoshop plug-in.

There are very few other formats that you really need to keep around if HD Photo can do all it says it can. It has all the important features of JPEG 2000 (see our j2k plug-in), but without the high CPU overhead that's preventing JP2 from appearing inside a camera or a whole lot of of other places. And yet the compression appears just as good as JPEG 2000, all while adding one very important feature—floating point pixel support. In very un-Microsoft fashion, they're providing free source code so it can be implemented on non-Windows platforms and even trying to make it an official JPEG standard called JPEG XR. (I'm sure the name's similarity to "OpenEXR" is purely coincidental.)

HD Photo also has one other benefit JPEG 2000 never had: the world's most pushy software company pushing on its behalf. HD Photo will be in your computer at some point (it already is if you're running Vista), the only question is: will you use it? Eventually, you probably will.

Not that HD Photo does everything. The product manager (interviewed here) sees HD Photo as replacing RAW, but that's one format I don't see it usurping. The whole point of RAW is to let users make decisions themselves that are normally made by the camera, and for that you need the raw CCD data. But he's right that HD Photo will replace Raw for people who are using it only because they don't want to lose bits when their camera converts to TIFF or JPEG, and are otherwise just sticking with the camera's decisions. If a camera saves floating point HD Photo files, clipping, color gamut, and bit depth issues will be of no concern (although using up space on the memory card will). That's all assuming Microsoft convinces camera makers to adopt it, of course.

OpenEXR is somewhat safe from HD Photo, although one big feature that HD Photo includes is variable lossy compression in floating point that you can tune with a slider. Compare to B44 compression in EXR, which is also lossy, but not adjustable. I really wish OpenEXR had this.

OpenEXR will probably stay the preferred format of high-end production because it supports a few key features that HD Photo left out, such as unlimited image channels of varying data types. (For some reason HD Photo will only support 8 channels, which would only amount to 2 layers in an EXR.) Also, having ILM behind OpenEXR and a community of industry professionals contributing ensures that the format will continue to keep pace with real production needs, which MS could never promise. But like DPX before it, OpenEXR may one day be familiar only to the pros and just a funny name to casual HDR users.

Incidentally, with all that free source code from Microsoft, you might think that OpenEXR could just add HD Photo as a new compression type. Wrong! Microsoft has cleverly worded their license to say that the public HD Photo code can't be used to do anything except support the HD Photo format. While what you do in the privacy of your own home is up to you, ILM could never get away with copying those (patented) algorithms into the OpenEXR code base. (BTW, ILM does not have this restriction on the OpenEXR code—they let you use it for anything you want.)

So HD Photo sounds really great. It's nice to finally see something coming out of Microsoft Research besides Siggraph papers. And yet there's the rub—do you really want to switch over to a format based on Microsoft-controlled patents? They say they won't be enforced, but do you trust them? I know Bob Cringely never would.

ProEXR Ships

We've shipped our first new plug-in in quite some time: ProEXR. Check it out.


This is one of those plug-ins that I was just dying to have for myself. I've been into the whole HDR thing for a while, and OpenEXR is definitely the format de rigueur. But there were so many things it could do that Adobe (and many other companies) weren't supporting, I had to intervene.

You may have seen that the After Effects plug-ins are open source—that's a first for us. Of course they're free too…although you get them in the commercial download. Hope that's not too confusing.

And you may be interested to know that file format plug-ins creating layers in Photoshop isn't exactly a supported thing and at several times during development I thought this plug-in would never make it. It was an exciting night when everything actually appeared to be working.

Enjoy!

YAB

Yet Another Blog. First I caved in and got a cell phone…now this.

But at least this blog isn't about me (Brendan) but about fnord software. And if you got this far, that's probably something you're at least a little interested in.

I'll post answers to common questions I'm getting asked, maybe add a blurb about something too esoteric to include in a product page. And I'll probably talk about some more general graphics topics too, but I promise not to post pictures of my cat (which I don't have), or my car (which I don't drive), or what I had for dinner (which I don't eat…oh wait, it was pizza).

All graphics and software all the time, folks. Enjoy!